An Introduction to Joseki
Contents
A joseki is the name for a known pattern or series of moves that generally result in a fair, even outcome for both players. There are many joseki patterns in Go - some are outdated, and some are still being discovered today. At the intermediate level, you do not need to spend a lot of time learning joseki. However, this lesson will introduce the concept to you and demonstrate two common joseki related to the 4-4 stone (a common opening).
The 3-3 invasion
Return to Top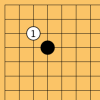
Dia. 1: The 3-3 invasion.
Many beginners do not know how to respond to the 3-3 invasion (dia. 1). It is important to understand that playing the 4-4 point does not guarantee corner territory, and that the White stone can live easily if White does not make a mistake. However, the invasion is not necessarily bad for Black. The 4-4 point focuses on speed and development, and the invasion will give Black a strong wall.
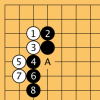
Dia. 2: The 3-3 invasion continuation.
In the standard 3-3 invasion joseki, Black will block the side at 2 (dia. 2). You can block on either side, but it is best to block on the side where your wall will be more effective. After 2, moves 3 to 8 are standard. Note that Black must stretch with 8, or else White will be able to cut at A.
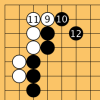
Dia. 3: The finished joseki.
Next, White will hane (make a diagonal attachment) at 9, and the joseki ends with Black 12 defending the cut (dia. 3).
White has taken some territory in the corner, however, it is small when compared with the large amout of influence Black gains towards the side and centre. When you play the 3-3 invasion, it is important to time it correctly as you do not want to give your opponent a strong position so early in the game.
The 4-4 Low Approach
Return to Top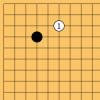
Dia. 4: The 4-4 point low approach.
A common way of approaching the 4-4 point is the low approach (dia. 4). Black has many options here; we will look at the most common joseki.

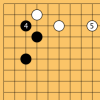
Dia. 5: The 4-4 point low approach continuation.
Black often responds with 2 (dia. 5), and then White 3 is standard. Black may choose to play elsewhere now, but this can be dangerous, depending on the position of other stones on the board.
Dia. 6: The result of the standard joseki.
Continuing the joseki, Black will defend at 4 (dia. 6). Then White finishes the joseki with 5. Both players have taken some territory and the position is usually regarded as even. Now Black can play elsewhere (but may consider extending along the left side).
Conclusion
Return to TopKnowing about joseki is a large part of Go. As you learn more joseki patterns and experience them in your games you will gain a better understanding of how the stones relate to each other. When studying joseki, do not try to simply memorize the patterns. Learning joseki is about understanding why the moves are played where they are, and how they are beneficial.
For further review, some study problems about the joseki covered here are available. You may also be interested in the next lesson, about the different stages of the game.
Suggested Reading
Return to Top- 38 Basic Joseki (Elementary Go Series, Vol. 2) by Kosugi Kiyoshi (8p) and James Davies.
- Modern Joseki and Fuseki: Volume One: Parallel Joseki by Sakata Eio (9p).