An Introduction to Go
Contents
Go is very easy to learn. It is known as a game which is simple enough to be learned by young children, but has such complex and interesting variations that computers are unable to master it. In ancient China it was one of the "Four Great Acomplishments" to be learned and mastered by scholars (along with music, calligraphy and painting). As you play you will learn more about the game and why it has captivated the minds of its players for over four thousand years.
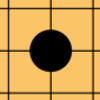
Dia. 1: Stones are placed where the lines intersect.
Go is played on a grid between two players. The players take turns placing black and white pieces called stones on the grid. You can play one stone per turn, and Black usually takes the first move. The stones are placed where the lines intersect (dia. 1). These intersections are called points. Ultimately, the object of the game is to surround more points than your opponent. Empty points you have surrounded are called territory. Think of the grid as an island - you and your opponent are competing to control more of the island than the other.
Capturing and Liberties
Return to Top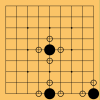
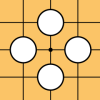
Dia. 2: In this example, liberties are marked with circles.
Once you place a stone on the board, it cannot be moved unless it is captured. A stone is captured when it runs out of liberties. Liberties are the number of lines extending from the stones (dia. 2). A stone in the centre of the board has four liberties. A stone on the edge has three liberties, and a stone in the corner of the board has two liberties. There are no diagonal liberties.
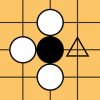
Dia. 3: The Black stone only has one liberty left. It is in atari.
When a stone only has one liberty left, we say it is in atari. This is similar to the "check" position in chess. If black does not respond, Black's stones can be captured on the next turn (dia. 3).
Dia. 4: The Black stone has been captured, and is removed from the board.
When a stone has no liberties remaining, it is captured. A captured stone is removed off of the board (dia. 4). Keep it aside for now - captured stones are used for scoring at the end of the game.
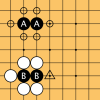
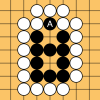
Dia. 5: Groups of stones share liberties.
Stones of the same colour that are connected (adjacent) to each other are called a group of stones. Groups of stones share liberties (dia. 5). In the diagram, group "A" has 6 liberties. White has to occupy all 6 liberties to capture Black (group "B" in the diagram is in atari).
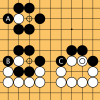
Dia. 6: If you capture stones which occupy your liberties, your own number of liberties increase.
In dia. 6, example A (top-left), White cannot play at the point marked with a circle. White would have no liberties and be immediately recaptured. This is called suicide, and is forbidden in most rulesets. However, in example B (bottom-left), the two Black stones also only have one liberty left. In this case, White can play at the point marked with a circle. This would capture the Black stones. Example C shows the result.
Dia. 7: Here, different Ko positions are marked with squares.
Ko is a situation in which Black and White could continue recapturing each other (dia. 7). In example A (top-left), White can capture Black by playing at the point marked with a square. Example B (bottom-left) is the result. Then, however, Black could also play at the square, and the result is Example A again. The rule of ko prevents this: A stone captured in ko cannot be recaptured immediately. You must wait at least one turn before recapturing a stone in the ko position. Ko is probably the most complicated rule in Go - do not worry if it seems a little overwhelming at first.
Life and Death
Return to Top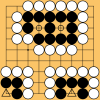
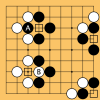
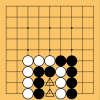
Dia. 8: Groups with two or more eyes are alive.
Some groups of stones cannot be captured. These groups are alive. A group which surrounds at least two separate points cannot be captured. These points are called eyes. A group with at least two eyes is alive. In the diagram, Black's top group is alive because it has two eyes (marked with circles), and can never be placed in atari. White cannot play in either eye, as that would be suicide. It is impossible to capture Black's top group (note that eyes can be larger than just one point).
However, Black's bottom groups only have one eye each. They are in atari. White can play at the point marked with a triangle to capture Black. Groups that cannot escape capture (have less than two eyes) are dead.
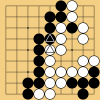
Dia. 9: This Black group only has one eye, because Black A can be captured.
Some eyes look like eyes, but really are not. These are called false eyes (dia. 9). In the diagram, Black only has one eye. The stone marked "A" is in atari, and White can capture it. Because Black only has one real eye, Black's group is dead.
There is no need for you to capture dead stones (unless they still pose a threat to your own stones). At the end of the game, dead stones are removed from the board and added with the captured stones.
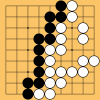
Dia. 10: Niether side can play at the point marked with a triangle, as that would be a self-atari.
A situation in which neither side can capture the other is called a seki. Think of it like a stalemate. In the diagram, if Black plays at any of the points marked with a triangle, White could play at the other triangle and capture Black. The same situation applies to White. This is sometimes called "dual life" because both sides are alive. At the end of the game niether colour is removed from the board.
Territory
Return to Top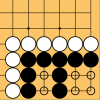
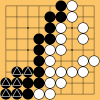
Dia. 11: Black has 6 points of territory.
Though capturing plays a large part in Go, your goal is to secure more territory than your opponent. Territory is the number of points surrounded by living groups. In the diagram, Black has 6 points of territory in the corner (marked with circles). Black is alive, because the group has two eyes.
Dia. 12: It is easiest to make territory in the corner.
You can use the edges of the board to help you make territory (dia. 12). In the diagram, each group of Black stones contains 8 stones. However, Black has a larger portion of territory in the corner, and a smaller portion in the centre. It is easiest to make territory in the corner, then the edge, and hardest in the centre as you require more stones to surround territory.
Ending the Game
Return to Top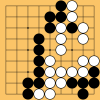
Dia. 13: A finished 9x9 game.
The game is over when both players agree that there are no more good moves remaining. This can be indicated by saying "pass" - when both players pass consecutively, the scoring begins (dia. 13). The diagram shows a finished game on a 9x9 board.
Dia. 14: Neutral points, called "dame" are marked with triangles.
First, fill in the neutral points (dia. 14). These are points where neither side has any territory. Usually, players take turns filling in neutral points.
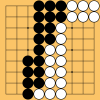
Dia. 15: Black had two dead groups.
After filling in all the neutral points, remove any dead groups from the board (If there is a dispute over whether a group is dead or alive, play it out and see if the group can be captured or not). Keep the dead stones aside with the captured stones. In the diagram, Black had two dead groups totalling six dead stones inside of White's territory.
Dia. 16: Place prisoners in your opponent's territory.
Next, place your prisoners (your opponent's dead stones and stones you have captured) in your opponent's territory (dia. 16). In the diagram, because White had six prisoners, six black stones have been added to Black's territory (marked with triangles). Alternatively, you may keep prisoners aside and add them to the score at the end of the scoring. Each prisoner is worth one point.
Dia. 17: You can rearrange the stones to make counting easier.
Although you could count the score now, the stones are look messy, and it would be difficult to count (especially on a larger board). To make counting easier, you are allowed to rearrange the stones in your own territory (dia. 17). In the diagram, the score is still the same as in dia. 16, but it is much easier to count territory.
In this game, Black has 23 points of territory. White has 21 points of territory. However, because Black has the advantage of playing first, White is given a number of bonus points called komi. Komi is usually 6.5 points (the extra .5 prevents draws). With 21 points of territory plus 6.5 komi, White has a total score of 27.5 points, and wins by 4.5 points.
Ranking System and Handicaps
Return to Top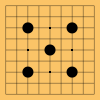
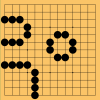
Dia. 18: Black has placed five handicap stones on the starpoints.
Go has a unique handicap system which allows two players to play a game on even terms, even if one is much more skilled than the other. The weaker player plays as Black and places a number of handicap stones before the game starts. These stones are usually placed on the starpoints, which are the small black dots on the board (dia. 18). Usually, each handicap stone is worth about ten points. So if Black and White played an even game, and Black lost by 30 points, Black would place three handicap stones in the next game. In a handicap game, White plays first (after black places the handicap stones).
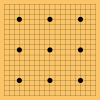
Dia. 19: Nine handicap stones on a full-size, 19x19 board.
Tied into the handicap system is a ranking system. In most parts of the world, a beginner would start with a rank of 30 kyu (pronounced "cue"). As you get better at the game, your rank will get closer and closer to 1 kyu (note that the numbers decrease as you improve). After passing the 1 kyu mark, ranking starts at 1 dan and starts ascending until 7 dan (9 dan in some systems). Professionals have their own ranking system which is based more on prestige than strength.
Each rank is usually worth about one handicap stone. So, a player with a strength of 10 kyu would be expected to give nine handicap stones to a player with a strength of 19 kyu (Dia. 19), just as a player with a strength of 1 kyu would be expected to give nine handicap stones to a player with a strength of 10 kyu.
There is no komi rule in handicap games. In a regular game, the player with the lowest rank always takes Black. If both players are of the same strength, komi is in effect, and the player who takes Black is decided in a process called nigiri. One player will grab a handful of stones, but keep the stones hidden. The other will guess "odd" or "even". If they guessed the number of stones correctly, they get to choose who takes Black. If they guessed wrong, their opponent decides.
Conclusion
Return to TopNow you know how to play Go. It is okay if this all seems a little overwhelming - once you start playing you will find that Go is a very intuitive game. Most Go sets have three components: board, stones, and bowls. However, you can start playing Go online, or search for a Go club near you. There are three main board sizes in Go: 9x9, 13x13 and 19x19. As a beginner you should play lots of 9x9 games, and move to larger sized boards when you feel ready. 19x19 is the most common size.
You may want to learn some useful tips before you start playing, or review what you have learned with some study problems. Please explore this website - there are many features designed to help you improve.
Suggested Reading
Return to Top- Go! More Than a Game by Peter Shotwell.
 } catch(err) {}