Useful Tips
Contents
This lesson will teach you about some useful concepts that beginners usually miss at first. Some of these are more useful on the 19x19 board than the 9x9 board, but it is important to understand the concepts behind them.
You will find that as you learn to recognize and use these moves, your gameplay will improve.
The Ladder
Return to Top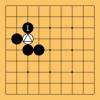
Dia. 1: The White stone is in atari.
The ladder is a very useful technique for capturing stones (dia. 1). It involves constantly reducing your opponent's stones to one liberty until they run out of room to run (in a stairway-like formation, which is where the name comes from). In the diagram, Black plays at 1 and the White stone marked with a triangle is in atari. Can it escape?
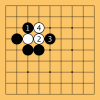
Dia. 2: White tries to run...
White tries to run with 2, but Black puts White into atari with 3. So, White tries to run again with 4...
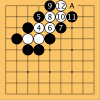
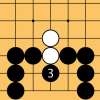
Dia. 3: White is chased to the edge of the board and captured.
Eventually, White is "chased" into the edge of the board, and has no more room to run. In the diagram, Black can capture all of White's stones by playing at A.
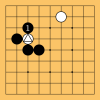
Dia. 4: A stone along the path of a ladder is called a ladder breaker.
A stone along the path of the ladder will interupt it (dia. 4). This stone is called a ladder breaker.
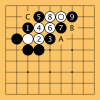
Dia. 5: White can cut Black at many places, because of the ladder breaker.
If the ladder continues, White will connect with the ladder breaker (marked with a circle in dia. 5). White has two liberties, and it is White's turn - White can cut Black and play a double atari at A, B, or C. The result is very bad for Black, because Black can only save one stone, and White will escape.
Thus it is very important to read out ladders. You will learn much more about ladders by experience as you play more games.
The Net
Return to Top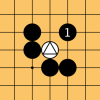
Dia. 6: The net involves trapping a stone, like a fish.
The net (called "geta" in Japanese) is a useful alternative to the ladder, for situations where the ladder does not work (dia. 6). In the diagram, Black plays 1 to trap the marked White stone. Although the stone is not in atari, it cannot escape from Black.
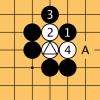
Dia. 7: White cannot escape.
If White tries to escape with 2 (dia. 7), Black can block White with 3. If White tries to escape with 4, Black can capture by playing at A.
The ladder is regarded as being faster than the net because it puts White into atari immediately. However, the net is not vulnerable to ladder breakers. Use your judgement to decide which is best in a situation.
The Throw-in
Return to Top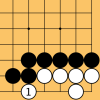
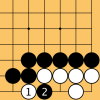
Dia. 8: White plays at 1, but does White have two eyes?
The throw-in involves sacrificing ("throwing-in") one of your stones, creating a false eye in your opponent's group or simply reducing liberties. In the diagram, Black can kill White by using a throw-in.
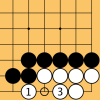
Dia. 9: Black plays a throw-in at 2.
Black can play a throw-in at 2 (dia. 9). This kills the White group. White should have made two eyes by playing at 2 instead of 1.
Dia. 10: White captures with 3, but has a false eye.
Even if White captures the throw-in stone (dia. 10), White now has a false eye (marked with a circle in the diagram), and is dead.
The Snapback
Return to Top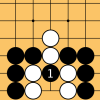
Dia. 11: Black plays a throw-in at 1.
The snapback is a situation in which stones can be immediately recaptured after capturing a stone. It is often setup using a throw-in (dia. 11). In the diagram, Black 1 puts four White stones into atari.
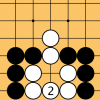
Dia. 12: Black can use a throw-in and snapback to capture White.
White can capture the throw-in stone with 2 (dia. 12). However, note that the five White stones only have one liberty, where Black 1 was.
Dia. 13: Black captures White in a snapback.
As the White stones only have one liberty, Black can capture all of them with 3 (dia. 13).
The throw-in and snapback can sometimes be very surprising. Use them to your advantage, and be careful about places where your opponent could use them.
Conclusion
Return to TopAll of these moves are very common in games. They are useful, but can also work against you. As you play more games, you will discover more about these techniques and how to use them properly.
For further review, some study problems are available.
Suggested Reading
Return to Top- Lessons in the Fundamentals of Go by Toshiro Kageyama 7p.
-Click here to read our review.
